Playful Penguins Punch Art

I saw these adorable little punch art penguins a few weeks back and thought they were so stinkin’ cute I just had to make some!

Itching to make them ever since, I knew I had my opportunity with the Friday Mashup Challenge #191.   This week’s Mashup Challenge is:

  • Create a project with a “Winter theme”.
  • Create a project with “Snowflakes”.
  • or Mash it Up! and create a “Winter project with Snowflakes”

Hello: Winter, Snowflakes, Penquins! It was a natural fit!


So here is my Friday Mashup – Penguins playing in the snow.

Penguins Playing in the Snow 
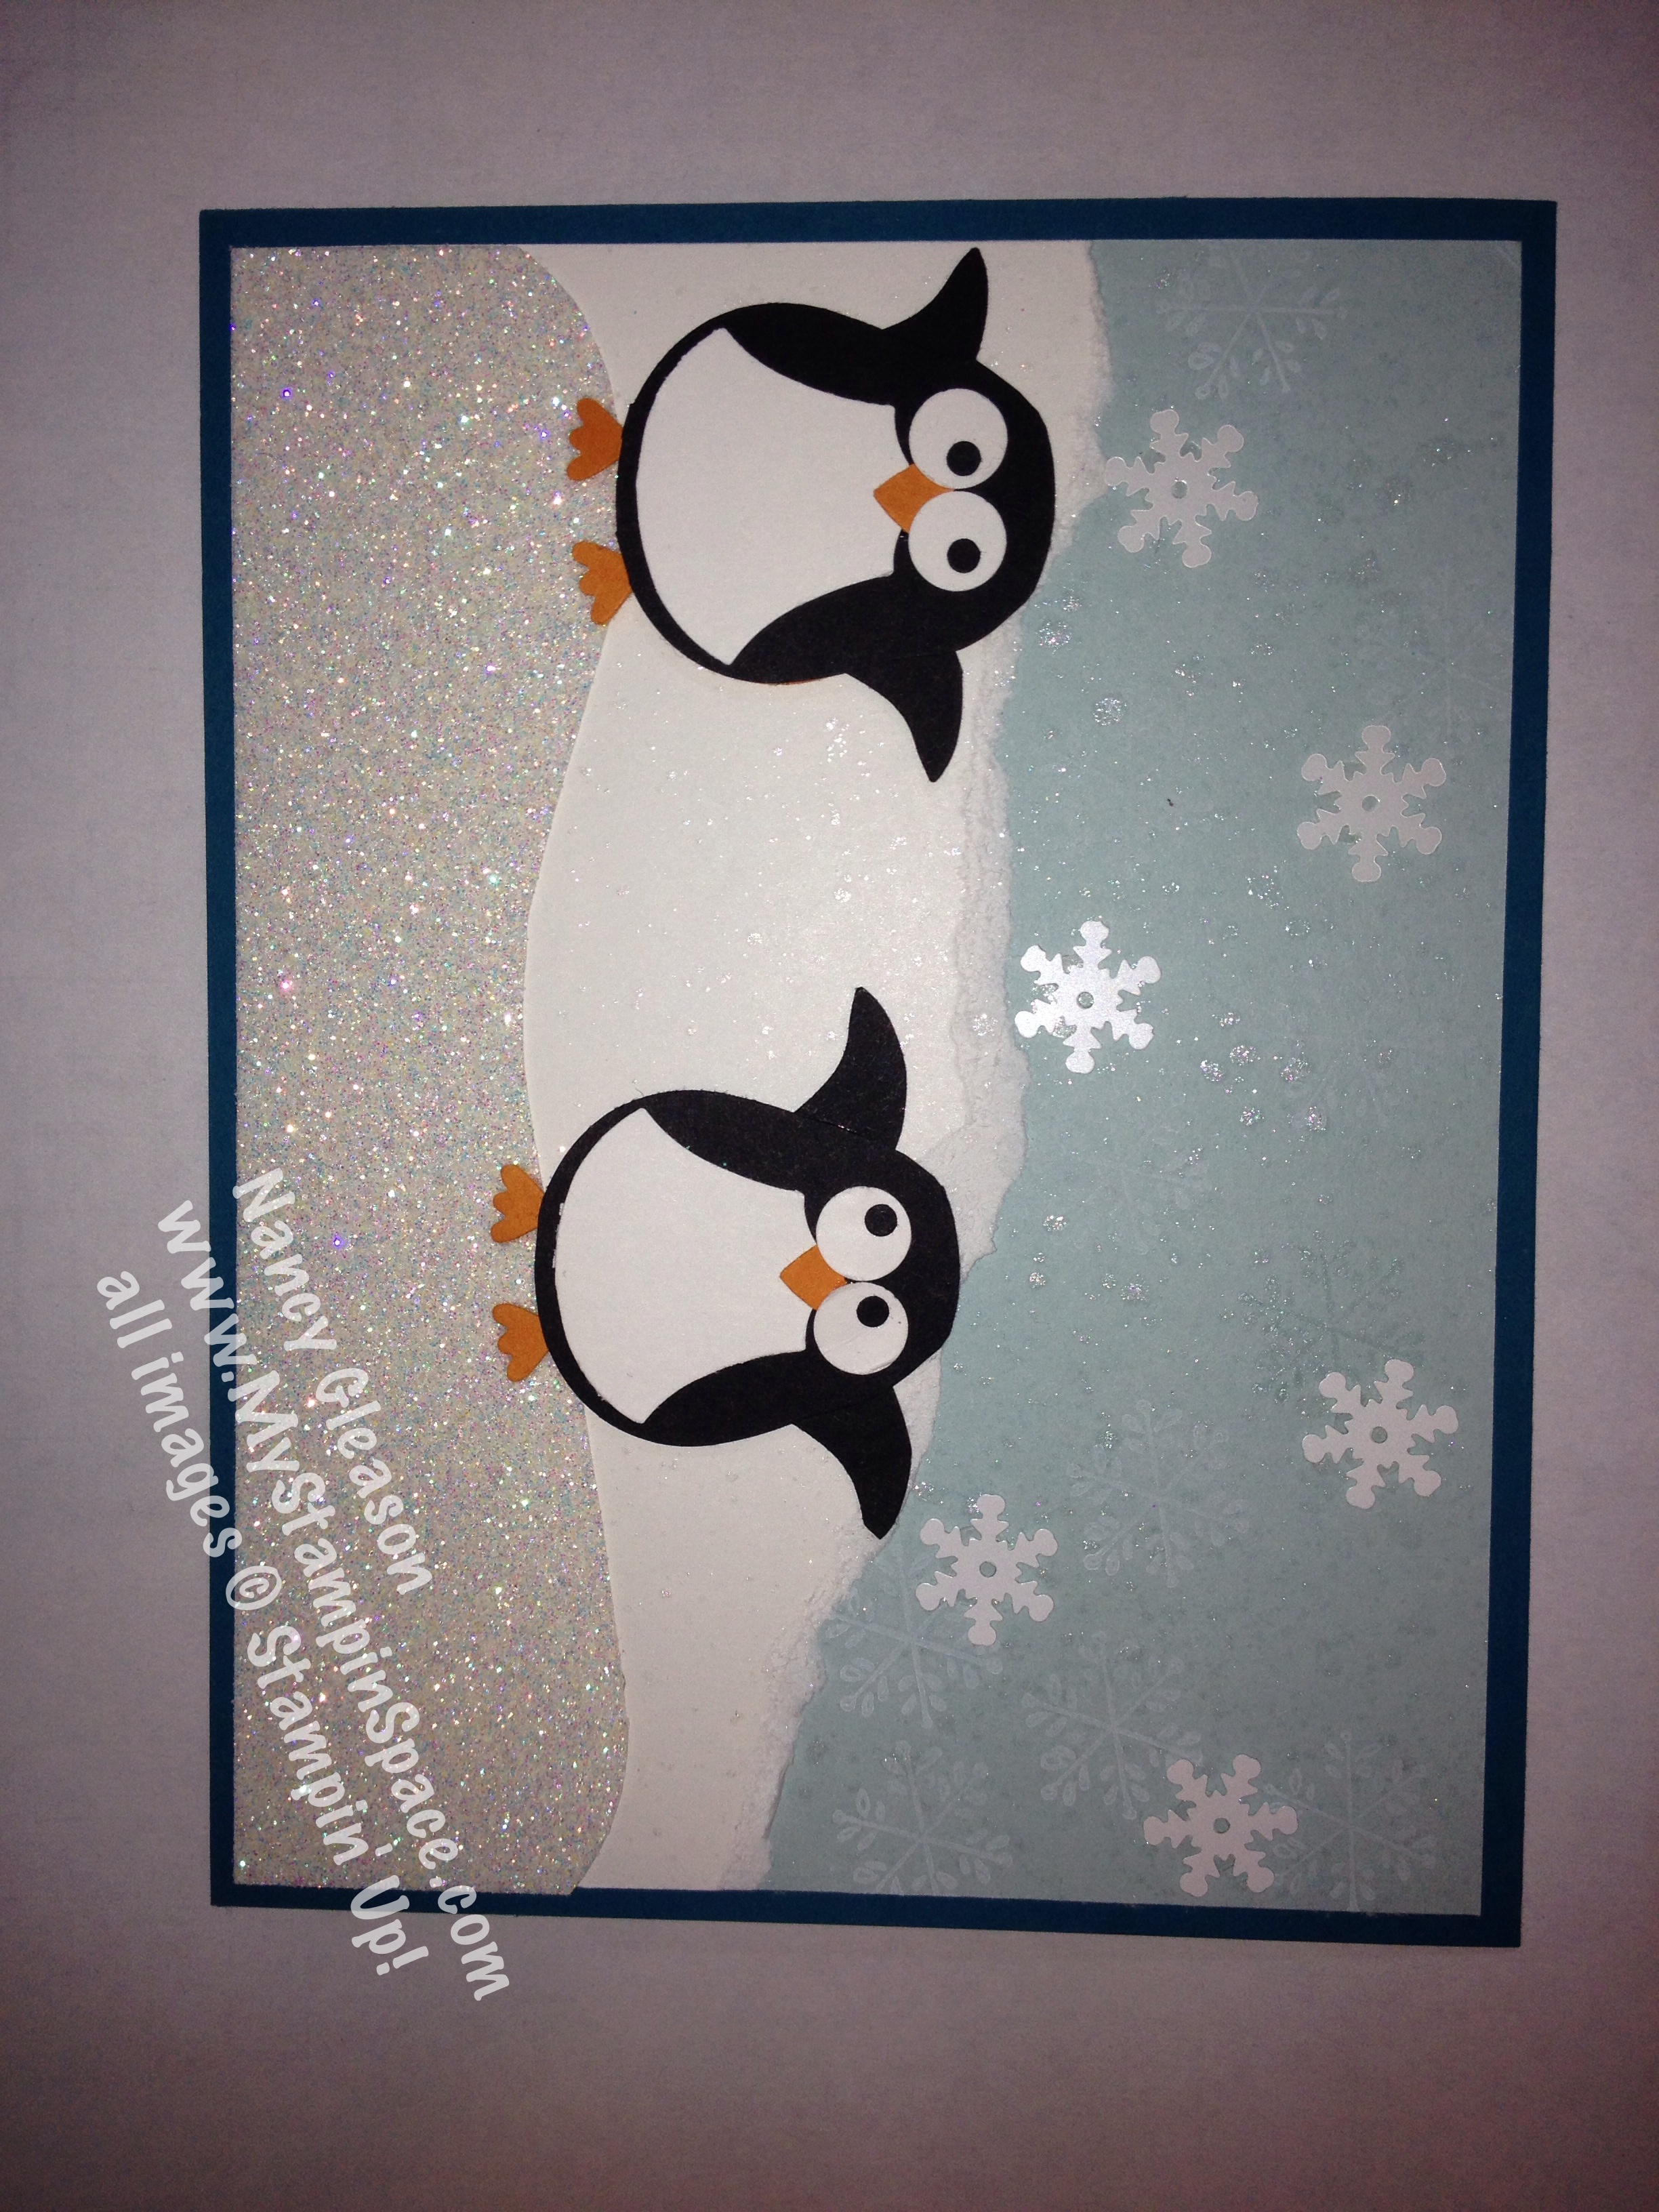
Aren’t they adorable?  I just love them.  Here’s a close-up of the stars of the show:  IMG_4505[1]

I thought I bookmarked the page where I saw them, so I could give credit to the designer, but for the life of me, I can’t find it!  My apologies!    They are created from the Stampin’ Up! Owl Builder Punch

I’ve created a PDF tutorial showing step-by-step instructions on how I made the penguins.

You can click here to download the PDF if you’d like to try your hand at making the penguins yourself.

I created the card by starting with a 5-1/2″ x 4-1/4″ Island Indigo card base.  A layer of Soft Sky cardstock cut to 5-1/4″ x 4″ was placed on top of that.  I cut a strip of Whisper White cardstock to 5-1/4″ wide and tore the top edge to create the snowy hills in the background.  I then stamped a snowflake using the smallest image from  Endless Wishes in White Craft Ink and in Illuminate ink.  I then sprayed this layer with Vanilla Shimmer Smooch spray to create the illusion of falling snow.

I used a strip of Dazzling Diamonds paper to create the snowy hill in the foreground.  Since the snowflakes were so soft & muted (and therefore, didn’t photograph well)  I added a few Frosted Snowflake Sequins just so the judges at the Mashup would know for sure that I added snowflakes 😉

The penguins were popped up using stampin’ dimensionals.  (Do I ever make a project without stampin’ dimensionals?  Hardly.)

Playful Penguins

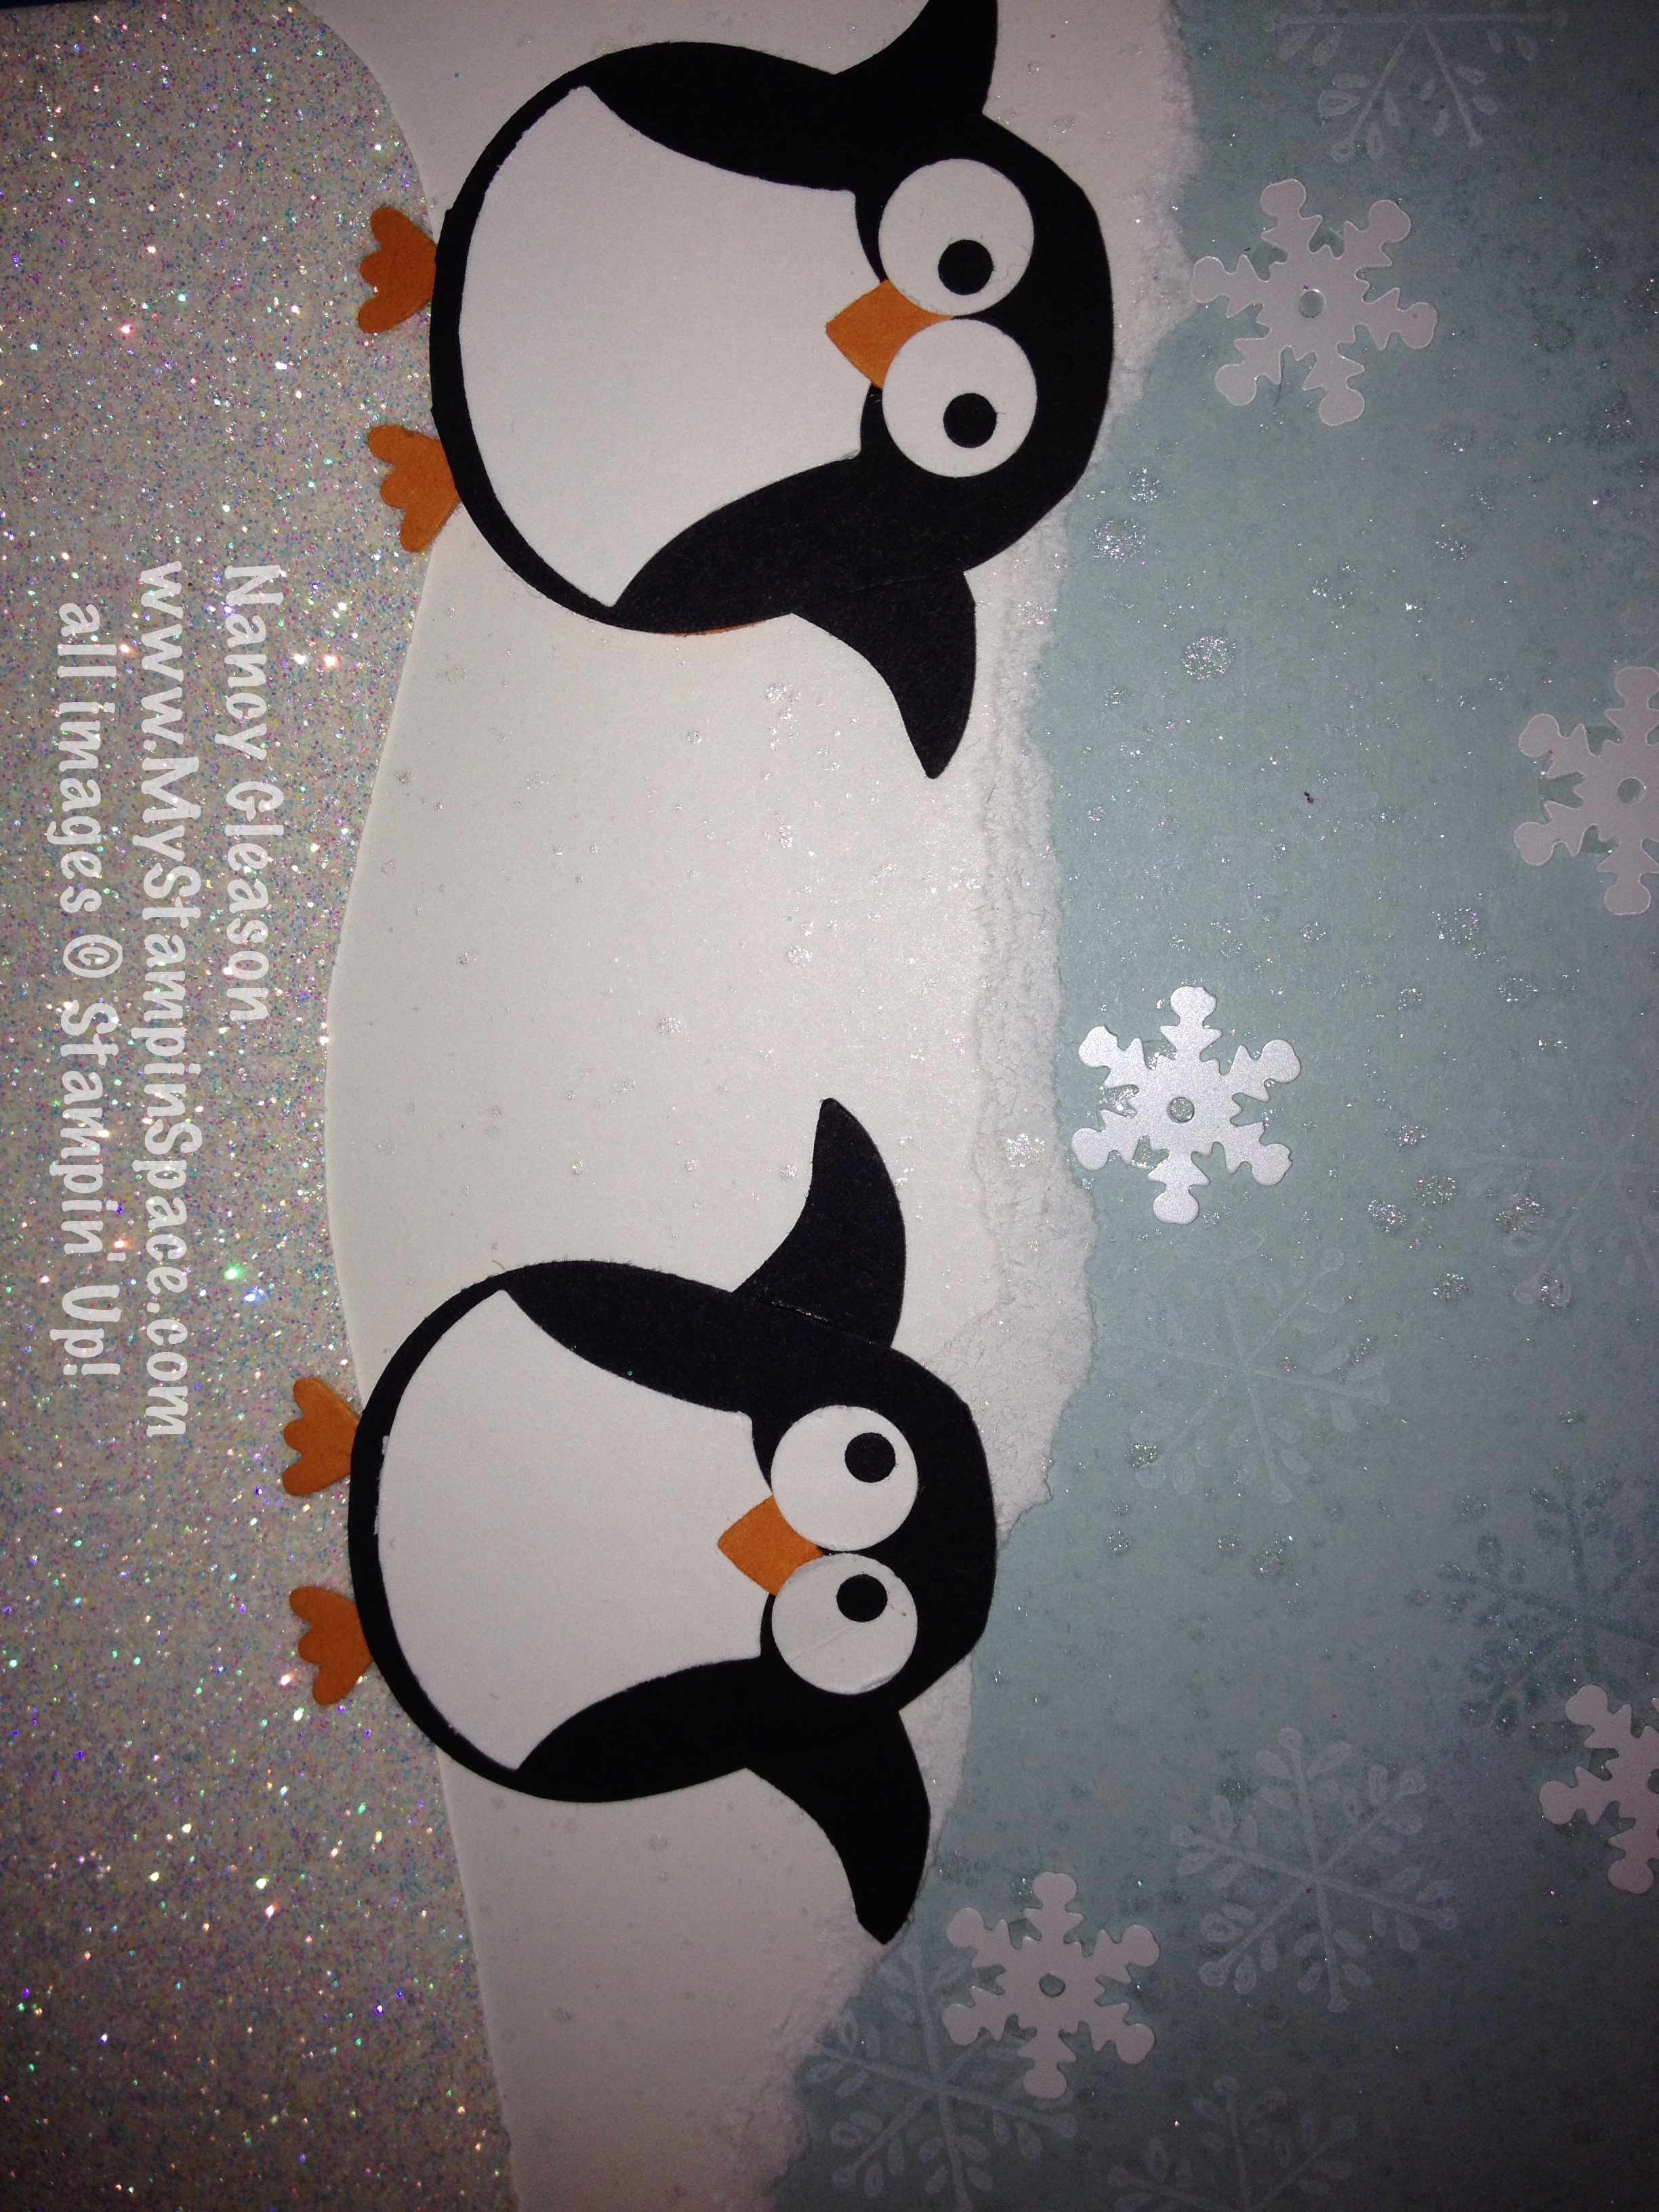
And I know you noticed that the two penguins are looking at each other.  Simply placing the black dots on the edges of the white circle, rather than the middle, allows you to make the penguins look as they are ‘looking’ in a particular direction.

Thanks for stopping by My Stampin’ Space.  I hope you like my penguins as much as I do.  Leave me a comment – I love to hear from you.  Please do print out my Penguin Punch Art PDF and try to make them yourself.   And if you do, please send me a photo of what you make; I’d love to know that I helped  you create something cute!

If you need any of the supplies to make this card, or any Stampin’ Up! supplies, click on the item name and go right to that product, or click here to go to my online store where you can shop safely & securely 24/7.   Don’t forget, the Year End CloseOuts end on Jan. 5th.  (The Frosted Sequins are on sale for only $2.99! so get them now before they are gone).   On Jan. 6th, our 2015 Occasions catalog and Sale-A-Bration catalog go live!

Happy Stampin’,

Nancy

November Pals Blog Hop

Welcome to the November Pals Blog Hop, we are thankful you stopped by!  This month we are showcasing projects that show our thanks, including both thank you and Thanksgiving themed projects.

2014novhop_backYou may just be starting the blog hop or may have come from Sherrie Gross at Stampin’ Sunshine on the Pals Hop. If you get off track at any time, the full lineup below will help you move along from blog to blog so you see all of the amazing projects.

Question?  What do baby wipes, styrofoam plates & ink refills have in common?  And what do they have to do with Thanksgiving, or being thankful?  Don’t ready any further or scroll down until you’ve had time to ponder that question.  Are you ready?  Are you sure?

Well, just to be sure, I won’t give that answer just yet.  I’ll show you my projects first.  Yes, I did say projects, plural.  I have not one, but two projects to show off today.

fall leaves 2

Fall LeavesTwo projects, but one technique.  The leaves in both projects are made the same way.  In the top card, I stamped the leaves onto Whisper White card stock and used my paper snips to fussy cut the leaves out.  In the second project, I stamped directly onto Very Vanilla card stock.

I used the “For All Things” stamp set for the leaf image.  “Good Greetings” was used for the sentiment in both cards – I sure hope you earned that set when it was available as a Host Promotion last month!   The Color Me Autumn DSP makes the colorful background.  These items can be ordered by clicking on their respective links, or click here to go to my on-line store where you can shop safely.

For All Things Clear-mount Stamp SetColor Me Autumn Designer Series Paper

So now for my answer:  Baby wipes, a styrofoam plate  & ink refills are used to create the beautiful, mottled effect I used for my leaves in my projects known as the baby wipe technique.  And my mailing list subscribers will learn exactly how to do this when I send a video lesson directly to them later this week!  Wait, you’re not a subscriber?  Well, go to the Mailing List Sign-Up box on the top right and sign up!  I’ll wait.  You’re finished already?  That was quick.  Now you’ll get this video lesson and learn how to do this too!

See the variegated, mottled effect this technique creates?  I taught the ladies in my Monday night class how to do this, and they LOVED IT!   I’m sure you will too so make sure you don’t miss my video class!

close up of leafThanks for stopping by My Stampin Space.  I hope to see you here again real soon.  In the meantime, continue the hop by following the line-up below.

Happy Stampin’

Nancy

2014novhop_nextThe next stop is Candy Ford at Stamp Candy on the Pals Blog Hop! Thanks for visiting and I hope to see you next month.

  1. Candy Ford at Stamp Candy
  2. Angie Valle-Peters at Paperluxuries
  3. Brian King at Stamp with Brian
  4. Beth McCullough at Stamping Mom
  5. Susan Itell at Simple Stampin
  6. Rae Harper-Burnet at WildWestPaperArts.com
  7. Amy L. Lazzell at Just A Thought…Cards by Amy
  8. Natalie Bradley at Natalie Bradley Events
  9. September Gray at septembergray.com
  10. Jane Knudsen at see jane stamp
  11. Nicole Watt at Pixel Maven’s Retreat
  12. Amy Whelan at Amy’s Inklings
  13. Amy Hoptay at Inking of You!
  14. Peggy Noe at Pretty Paper Cards
  15. Martie Pollard at The Crafty Bandit
  16. Kerry Willard Bray at Peonies and Paper Chains
  17. Katy McGloin at Just Fun Stamping
  18. Mary Fish at Stampin’ Pretty
  19. Susan Lankford at Stamp and Create With Susan
  20. Debbie Mageed at Secret Stamper
  21. Beth Beard at My little craft blog
  22. Lisa Ann Bernard at Queen B Creations
  23. Patti MacLeith at Papercrafts By Patti
  24. Wendy Klein at Doggone Delightful Stampin’
  25. Jackie Diediker at Stampin’ Jackie
  26. Dawn Tidd at Tiddbits from Dawn
  27. Debbie Crowley at expressivelydeb…
  28. Kim Jolley at Stampin’ Artfully
  29. Sue Becker at RnR Stamping
  30. Becky Volpp at Inkblossomwithbecky
  31. Kalyn Shubnell at The Stamping Chronicles
  32. Sherrie Gross at Stampin’ Sunshine
  33. Nancy Gleason at My Stampin Space – – – YOU ARE HERE! – – –

New to Rubber Stamping?

Whether you’ve been rubber stamping for a long-time or a newbie, there are certain basics you’ll need to keep in mind to be successful.  First, you’ll need good quality rubber stamps, inks, paper, adhesive and a good cutting tool.  And sometimes you just need someone to teach you new techniques, inspire you and show you the ropes.

My first introduction to rubber stamping was 7 or 8 years ago at a Stampin’ Up! workshop.   I had never heard of Stampin’ Up! before attending this workshop, and I always wondered the big deal was about rubber stamping.  I thought, stamp to ink to paper, then what?  How could you make that into a work of art?  I’ve seen rubber stamps with nice images at the craft stores but didn’t know how to turn that into something special.

My introduction to the world of rubber stamping, and Stampin’ Up! that night was life-changing!  Really.  I discovered a world of color, coordinated color, paper, inks, and how to use different ink colors on 1 stamp to make an image come to life.  I learned to cut and glue and add ribbon or a button to embellish.  I was hooked!   I couldn’t sleep that night – I just kept staring at what I made and thinking of all the possibilities of what I could make!  I couldn’t wait for my order to come in so I could start creating.

Here is my very first card that I ever made that fateful evening:

IMG_3765[1]So simple and yet, to me, so beautiful; a work of art!  I don’t remember the name of the stamp set, but I remember using Stampin’ Write Markers to color the stamp.  The ribbon & brads were the icing on the cake .

I jumped at the chance to be part of a stamp club; an opportunity to get together with other ladies who wanted to create with paper & rubber stamps, to learn from our Stampin’ Up! demonstrator and to start my own collection of paper and ink & stamp sets.  My monthly stamp club was something I looked forward to with anticipation.

After a number of years in that club, and encouragement from all the other ladies in my club, I stretched myself to join Stampin’ Up! as a demonstrator and to start teaching rubber stamping to others.  I still light up whenever I see someone take a rubber stamp to an ink pad and then to paper for the first time and watch as they marvel at their first creation!  I love teaching Stampin’ Up! and I still look forward to my Stamp Club or Class nights.  The fun, the camaraderie, the laughter, the projects.

I would love if you would join me for a stamp class:  I’m hosting a few events in the coming weeks.  Click here for the list of classes.  But I’m also available to come to you and teach a workshop with you and your friends.  Email me to schedule your own workshop.  If this looks and sounds like fun to you; or if you are just curious as what to do with an ink pad and rubber stamp, join me.  My open house on Sept. 13th is free so there is no commitment except a few hours of your time.  The other classes have a nominal fee to cover the cost of supplies.

Don’t live in the NE PA area?  My classes & stamp clubs don’t fit into your schedule?    Join me for a Virtual Stamp Club.    I’m starting a Virtual Stamp Club where we will get together in the comfort of your own home, at your convenience and stamp once a month.  I’ll still teach a new technique each month, and you’ll have the chance to build your stash of supplies.   Sound like fun?  Indicate your interest by emailing me and I’ll send you all the details.

Hope to see you soon.  Stamp happy!

Nancy


Pretty Packages, Flowers & File Folders

Well, I hope you’ve had a chance to view the videos I shared in my last post.  Isn’t the “What’s Your Type?” stamp set so cool? I bet if you’re like me, you probably would have skipped right over that set when perusing the catalog because you didn’t know how totally awesome & versatile that set is. Now that you know, is that stamp set on your wish list? It made it to my Wish List “A” list; it’s on it’s way to my right now!

Now I have some more videos for you to watch today!  So grab a coffee, sit back & relax!  You’re going to love these videos!

Now, go grab your paper, punches, Big Shot and start creating!   Share your creations with me;  I love to show off what my customers make.  Send me a pic and I’ll post it on my blog!

Speaking of creating, how would you like a craft kit to appear on your doorstep, filled with all the supplies you need to create a complete project?   Each month, a different project. Each month, the anticipation of what’s to come.   I’m talking about My Paper Pumpkin, the monthly craft kit. Order yours before June 10th and you’ll get it half price! Normally just $19.95 per month (Shipping included!); enter promo code JUNE2014 when ordering your June kit and you’ll pay only $9.97!

halfoffinJune

To get your kit, just Click Here to sign up and create an account.   You can enter your credit card info and continue to receive a Paper Pumpkin kit each month and you can cancel at any time.  But, you probably won’t want to!  Watch this and you’ll see why: http://youtu.be/ikJ-hKWgfWc

For only $10, you can’t afford NOT to try this. Order your June kit now, before the 10th of the month to take advantage of this half off promo!

See you soon!
Nancy

Let’s take a tour of the new catalog!

I’m so excited about the launch of the new catalog and the bevy of new products being offered! Click the catalog cover below to view a PDF version of the catalog.

2014/15 Stampin' Up! Annual Catalog

Stampin’ Up! has produced a number of videos showcasing their new products and I wanted to share a few of my favs with you today.  (I’ll be sharing more in the next few days so come back every day!)

This is a great video explaining the difference between the 3 types of stamps offered by Stampin’ UP! – wood mount, clear mount and photopolymer.

Here is a video about Fast Fuse: the new adhesive offered by Stampin’ Up! – What it is and why you would want to use it and a tips on how to use it.

What’s Your Type? This is the coolest stamp set I’ve ever seen and if I wasn’t shown how awesome & versatile it is, I may have just skipped right past it. I want to make sure you know how awesome it is too, so watch this video! From geometric designs to the entire alphabet, this will take your scrap-booking and home decor to another level!

Come back tomorrow; there are more videos in store for you. Together we’ll make pretty packages, flowers and file folders!

If you want to order any of the new products shown in these videos, or any other Stampin’ Up! products, click here to enter my on-line store or just click on the shop now button on the right.

DemoHeader_SignandsaveUS

Is your wish list bigger than your budget?

Now may be the perfect time to join Stampin’ Up! and take advantage of all the perks and discounts of being a demonstrator!   Choose either or standard Stampin’ Up! Starter Kit for $99 (which includes your choice of $125 of products) or thru June 30th, you can purchase a Starter Kit for only $50 (filled with your choice of $55 worth of products).  Purchase your kit through me HERE, and you’ll not only join Stampin’ Up! (with all the perks and discounts of being a demonstrator), you’ll instantly become a member of the Stampin’ Pretty Pals Virtual Community  which offers exclusive resources, inspiration, friendships and fun!  This offer is not just for those who want to build a business, but for anyone who wants to feed their paper crafting passion.  Many in our group are strictly hobby demos – there is no obligation to ‘sell’ anything!

BLENDABILITIES UPDATE:  The Stampin’ Up! Blendabilities Markers will not be available for customer purchase on June 2 when the catalog begins.  Stampin’ Up! expects to have enough inventory to meet customer demand at the end of June or early July.  I’ll keep you posted on a date. 
A COOL WAY TO GET BLENDABILITIES NOW:
  The following Blendabilities Markers are available to Stampin’ Up! demonstrators immediately, including the option to add them to the $50 Stampin’ Up! Starter Kit or  the $99 Stampin’ Up! Starter Kit or when placing a demonstrator order after you join (and getting a discount on them)!

  • Cherry Cobbler (item #130995)
  • Coastal Cabana (item #131000)
  • Daffodil Delight (item #130998)
  • Old Olive (item #130999)
  • Pumpkin Pie (item #130997)
  • Rich Razzleberry (item #131003)
  • Skin Tone Assortment (item #129370)

In addition, the following accessories are also available:

  • Memento Ink Pad (item #132708)
  • Memento Ink Refill (item #133456)
  • Color Lifter (item #129369)

Thanks for stopping by My Stampin’ Space!  Come back again and hang out with me.  Leave me a comment and let me know what you think of the What’s Your Type?” stamp set.  Is this something you have to have now that you’ve seen what you can do with it?  I love to hear from you.

Happy Stampin’!

Nancy

Pals Paper Arts Color Challenge

Ok, so I’m a little late getting this posted, but as they say “Better Late than Never”!  The Pals Paper Arts Color Challenge for this week is Real Red, Soft Sky and Whisper White.  Don’t you just love these colors together?PPA Color Challenge 187:  Real Red, Soft Sky, Whisper White

  I knew immediately what stamp set I wanted to use for this color challenge, Crazy, Mixed Up Love.   Don’t ask me why but I just thought the blender image would be great done in Soft Sky & Real Red.

PPA 187 I wanted the hearts swirling around inside the blender, and the buttons on the blender to be red while the blender itself was blue.  So my first thought was, “I’ll use markers.”  Great idea, except, I don’t have Soft Sky in a Marker; only an ink pad.   So what’s a girl to do?  Well, I considered my options but I finally decided I would ink up the stamp entirely using my Soft Sky ink pad.  Then use my Blender Pen to ‘pick up’ the ink off the stamp where I wanted it to be Real Red.  After I removed the ink from those places, I used my Real Red marker to color in the hearts & buttons.  Huff, Huff, and then I stamped as usual.   Perfect!  No one will ever know I didn’t have a Soft Sky Marker (except you, but you won’t tell anyone my little secret, will you?)

So now you know what to do when you want to color in a stamp  but don’t have the marker color you want.  This works best when color that is the main, or larger area of the stamp, so you only have to remove a small area.

Supplies:

Crazy, Mixed Up Love
#131071 (C), #131068 (W)

Don’t you just LOVE this adorable stamp set?  It’s perfect for Valentine’s Day, or any day that you want to share your love with someone.  You can click on the picture above and go right to my store and order your stamp set today.  Know what else is really cool about this set?  It’s available in German, French & Spanish too, so you can share your love, whatever your language!

I used a piece of Real Red C’oredinations cardstock from the Brights Collection because I really wanted the texture for this layer.  A piece of Soft Sky cardstock frames the Whisper White cardstock that I stamped on.  A little piece of 1/8″ Taffeta Ribbon in Real Red  ties everything together.

Did you notice the little flagged-end banner?  That’s a new Stamp Set & coordinating Punch from the Sale-A-Bration catalog which will make its’ debut Jan. 28th.   You know  any stamp set that has a coordinating punch or framelit die, goes right to the top of my “Must Have” list.

Please tell me if you like the card I made.  Tell me too, if you like this stamp set.   I plan on sharing more samples made from this set in the next few weeks so stay tuned!  Come back tomorrow for more sneak peeks from the Occasions Catalog and Sale-A-Bration.  Tomorrow is our Pals Blog Hop so you’ll be treated to many great projects from the Pals.

Like me on Facebook so we can stay in touch there too!  Thanks!  🙂