Hello Fabulous!

So once a month I host a Club; nick-named the “Craft Cult” by one of the ladies’ husband! The name stuck and we’ve been calling ourselves the Craft Cult ever since! Well both last month and this month, we’ve had to meet via Zoom. It’s been fun trying to come up with projects that we can all make together, separately from our own homes, using whatever cardstock, stamp sets, inks, & embellishments we each have.

This past weekend, I made two projects for our Craft Cult; each with a new technique, and I’d like to share one of those with you here.

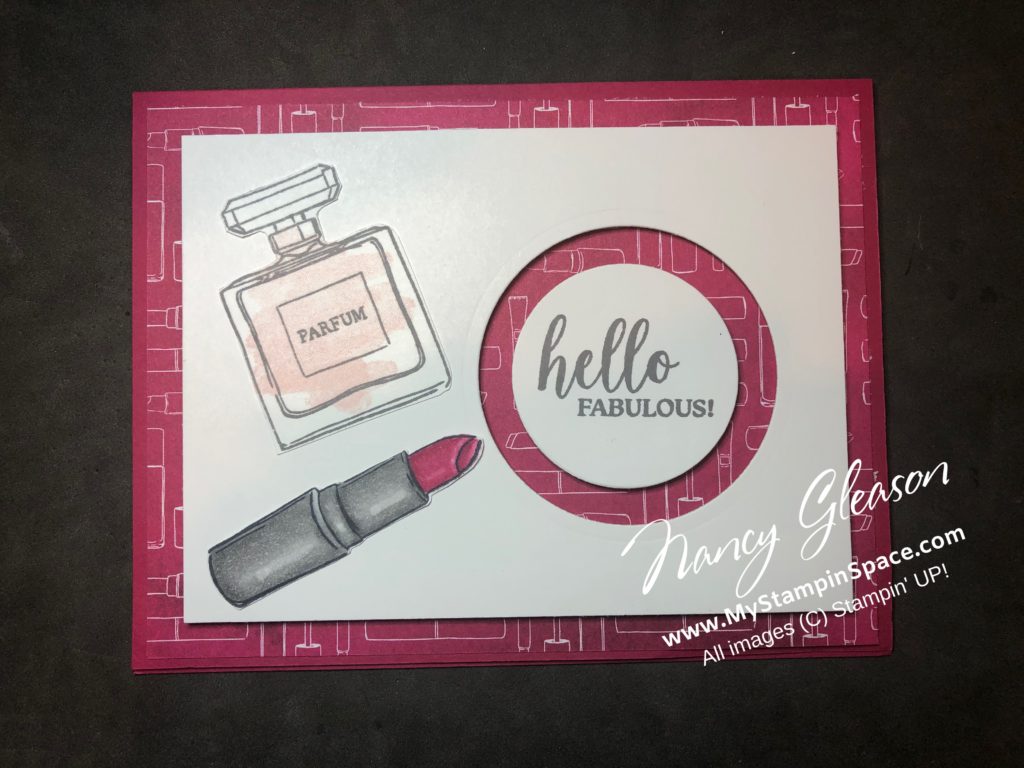
Nesting Spotlight Technique

I don’t know if this has a name or not but I’m calling it the Nesting Spotlight. Basically you use any shape of nesting dies; I used the Layering Circle dies here. Simply nest and cut two different sizes at the same time. You’ll be left with a ‘donut’ and a full circle. The donut is garbage but you keep the smaller circle. You may want to use tiny strips of Washi Tape to hold your nesting dies in place as it running through the die cutting machine.

How to make this card:

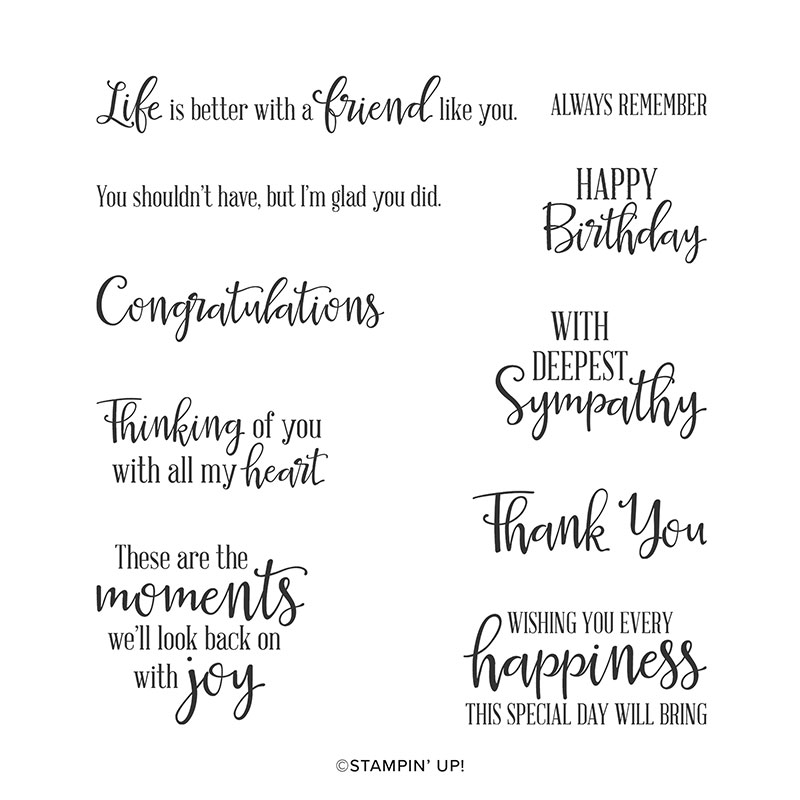
I used Lovely Lipstick ( a Retiring 2018-2020 In Color – you can see my tribute post to all the Retiring 2018-2020 In Colors here) cardstock as my card base. My card base is an 8-1/2″ x 5-1/2″ piece of cardstock scored & folded in half. I used a piece of Best Dressed DSP cut to 5-1/4″ x 4″ on top of the card base. Then I used a piece of Whisper White 3-1/2″ x 4-3/4″. This is layer that I cut my nesting circles out of. I decorated this with stamped images from the Dressed To Impress stamp set and I stamped the Hello Fabulous greeting onto the small circle left behind. Then I propped this up on the card base with stamping dimensionals, added the circle, also on dimensionals. The negative space around the smaller circle just causes your eye to laser in on the sentiment. Very easy and adaptable to any stamp set and DSP that you have on hand.

I chose the lipstick patterned sheet of DSP to compliment the tube of lipstick that I decorated the front of the card with. Let’s take a closer look at the lipstick:
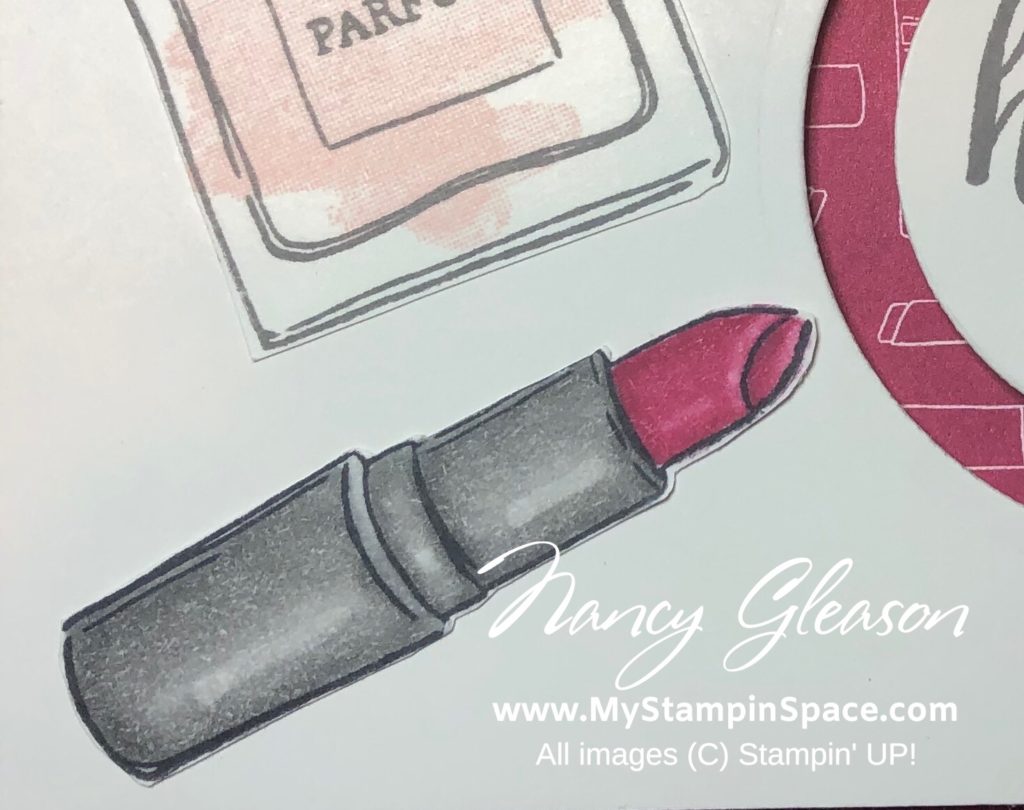
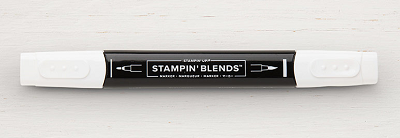
Stampin’ Blends

I colored this lipstick tube with the Stampin’ Blends markers. If you would like to learn to use the Stampin’ Blends to color like this, I just announced that I am starting an Online Class Series called “How to Use Your Stampin’ Blends”. If you are interested in this class, you can get all the details and register for that class here.

Please leave me a comment and let me know what you think of this technique. Is this a technique that you’d like to try? I’d love to hear your thoughts.

And now Hello Fabulous needs to jump into an envelope and head on over to a lovely lady who needs some cheering up while she’s isolating at home alone.

Nancy

Painted Poppies for all Occasions

The beautiful flowers in the Painted Poppies stamp set lend themselves to all kinds of artistic expression. Yesterday I shared a quick and easy card made with this stamp set; you can see that card here. And I’m calling today’s card Painted Poppies for all occasions and you’ll see why in just a bit

Today I want to share a card using Painted Poppies colored with the Stampin’ Blends markers for a totally different look. Take a look:

a card designed by Nancy Gleason of My StampinSpace using the Painted Poppies and Peaceful Moments stamp sets and the Peaceful Poppies DSP

See how they are totally different?

The coordinating dies from the Painted Labels dies (bundle and save 10% and earn a FREE SaleABration item!) make quick work out of cropping out the shapes. But when you combine them with the sentiments from the companion Peaceful Moments stamp set, you can create a card for any occasion.

Peaceful Moments stamp set #151595

Just like the card I featured yesterday, you can simply swap out the sentiment to make a card for any occasion. The Peaceful Moments stamp set is perfect for so many different occasions it just a ‘must have’ stamp set.

Card Details

On this card I also used the coordinating Peaceful Poppies Designer Series Paper against a Pool Party cardstock layer. The flowers are colored with Poppy Parade Stampin’ Blends and the leaves with Old Olive Stampin’ Blends. The “With Deepest Sympathy” sentiment was stamped in Momento Tuxedo Black ink, then fussy cut with paper snips.

I love the Peaceful Poppies Suite; there are 2 companion bundles. The Painted Poppies Bundle and the Peaceful Moments bundle. Both bundles have stamp set and dies and they both coordinate so well together. Add the Peaceful Poppies Designer Series paper, and matching embellishments and you’ve got the makings for so many different cards, gifts and home decor items. You can order the whole Peaceful Poppies product suite as a bundle with just 1 order number AND you can earn FREE Sale-A-Bration items when you do!

Sale-A-Bration

Sale-A-Bration is in full swing! With every $50 of product that you order, you earn 1 FREE SAB item. There is no limit on the amount of items you can earn. When you host, or place a qualifying online order of $150 or more (before tax & shipping) you earn Host Rewards too! A $300 workshop or online order gets a FREE exclusive Little Ladybug stamp set too! Consider adding a prepaid Paper Pumpkin subscription to your order to increase your SAB earnings!

The best deal, though is the $99 Starter Kit. You choose $125 worth of products, score Free Shipping and Biz Supplies, and during SAB you’ll also get an exclusive mini paper cutter, a 6×6 DSP stack, and an additional stamp set of your choice (any value). You can order the $99 Starter Kit here.

Please leave me a comment and let me know which card you like better: yesterdays card that you can see here, or today’s card Painted Poppies for all occasions.

Stackin’ ‘Em Up! – a card for a co-worker who got a promotion

Today’s project is for the Paper Players Challenge – a tall and skinny card. It’s the perfect layout as I need to make a card for a co-worker who got a promotion. Actually, it is my boss who just got promoted and she’ll soon be leaving us and moving on to bigger and better places. I quickly added the “Welcome to the Team” stamp set to my order as I knew it would get a workout with my boss leaving, and a new person coming in to take her place. Plus it has several sentiments perfect for co-workers in many situations. You can see the Welcome to the Team stamp set here.

Now let’s take a look at my card:

All Stacked Up for a Promotion -a tall and skinny card by Nancy Gleason for the Paper Players Challenge #460

The tall and skinny layout is perfect for stacking the chairs up. I thought the stacked chairs represented moving up in the world, which is what happens when you get a promotion, right?

The Paper Players Challenge # PP460

Click on the challenge picture to head over the Paper Players blog and play along.

Paper Players Challenge #PP460

Stampin’ Blends were called in to create an ombre effect of office chairs. I love coloring with the Stampin’ Blends. I’ve been teaching a Stampin’ Blends Color Club Class, once a month for the past 8 months and the more I use them, and work with them, the more I love them! (Spoiler Alert – I’m going to start offering the Stampin’ Blends Color Club Class as an online class! If this interests you, let me know). Take a closer look at the shading and blending:

Stampin' Blends create an ombre effect in the stack of office chairs

The Details

I used a different color of Stampin’ Blends markers on each chair, from the top I used Mint Macaron, Pool Party, Bermuda Bay and Pretty Peacock. Using the darkest color on the bottom visually ‘grounds’ your elements. I stamped the chairs in Momento ink (perfect when using the Stampin’ Blends), and the sentiment on a scrap of cardstock. I used my paper snips to fussy cut the sentiment- this made it fit better and gave the visual interest of overhanging the layer as well. A few Glimmer Enamel Dots add some bling.

To create the Tall & Skinny, I started with a piece of Bermuda Bay cardstock 2-3/4″ x 11″ scored and folded in half. Then a piece of Basic Black cardstock cut to 2-1/4″ x 5-1/4″, and finally Whisper White Cardstock cut to 2-3/8″ x 5-1/8″.

This card was so fun to make! I hope that you enjoy it, and even more so, I hope that I inspired you to make a card like this yourself if you need to make a card for a co-worker who got a promotion. To order any of the supplies I used to make this card, visit my online store here.

If you are placing an order, don’t forget to visit the Clearance Rack, it was just recently re-loaded with lots of items which are available at deep discounts while supplies last.

Update: Purple Posy Ink is now available to order! You can order an individual Purple Posy ink pad, or the 2019-21 InColor Ink Pad Collection.

Have you signed up for my Mailing List? My mailing list subscribers get members only exclusive project tutorials, tool tips and more! Click here to sign up for my Mailing List.

Like me on Facebook to follow me on Social Media.

Thanks for stopping by My Stampin’ Space. See ya soon! – Nancy

Meet Lenny!

My husband and I just returned from a vacation in Maine. It was absolutely wonderful! Maine was everything I had hoped for and more! I’ve never been there but I’m sure I will go back. It was so beautiful. And I ate so much good food – yes I had my first lobster roll, delicious! And blueberry pie and blueberry pancakes. I even brought home wild Maine blueberries and made a pie. I shared my pie (and the recipes for both my homemade pie crust and my blueberry pie filling) on my Facebook page.

And wildlife – we went on a Whale Watching Tour! Such magnificent creatures and it’s hard to fathom the sheer size of those whales! The famous Maine wildlife that we didn’t see were moose. But I did meet Lenny! And I want to introduce him to you now too!

Lenny the Chocolate Moose

Lenny is a 1700 lb. Chocolate Moose! Yes, he is solid milk chocolate! Now that’s my kind of wild life! But I wasn’t allowed to take a nibble of him 🙁 Isn’t he adorable?

Freshly Made Sketches Challenge

Lenny was the inspiration for my card. When I saw the sketch from the folks at Freshly Made Sketches, I just knew that sketch was made for the Moose from the new Merry Moose stamp set.

Here is the sketch:

And here is my card:

I also broke out my new Birch Background stamp and just used a neutral combination of Early Espresso and Crumb Cake for my layers and just a pop of red for the scarf. An easy card to make and the sketch was perfect. But after sleeping on it, I woke up with an idea to step up the card a bit so here is my second card:

Merry Moose for FMS400

For this card I used the Woodlands Embossing Folder for the background instead of the Birch Background stamp and I made the image panel larger. I stamped a few trees in Mossy Meadow ink and this time I stamped the moose and colored him using the Stampin’ Blends markers and cropped him out with the coordinating Moose Punch. The scarf was stamped in Real Red and fussy cut with my paper snips.

So which one do you like better? The simple card or the stepped up version? Please leave me a comment and tell me what you think.

If you like the Merry Moose stamp set and Moose punch, you’ll be able to purchase them as a bundle when the Holiday Catalog goes live on Sept. 5th!

2019 Holiday Catalog

2019 Stampin' UP! Holiday Catalog

You’ll be able to view the catalog online right here on Sept 5th. If you are one of my customers then your catalog is in the mail to you. If you don’t currently work with a Stampin’ Up! demonstrator, and want a catalog, email me and I’ll get one to you!

You can read more about my Maine vacation on my Facebook page so please head over there and Like my page while you’re there. And if you haven’t already done so, sign up for my mailing list here. My 12 Weeks of Christmas newsletter campaign is going to start in several weeks and you won’t want to miss that!

Thanks for stopping my by My Stampin Space today! Stop back again on the 5th to view the catalog online.

Nancy Gleason. Stampin' UP! demonstrator, teacher, and blogger

Buffalo Check

I may be a little bit late to the Buffalo Check party, but I’ll be making up for lost time for sure!  As soon as I saw the Buffalo Check background stamp in the 2018 Holiday Catalog, I knew I had to have it!  But since I was pacing my budget with the trip to Orlando, FL for OnStage, I didn’t get it right away.    My order arrived a few days before Thanksgiving but today was the first day I could actually ink that stamp up and use it.  This is the first card I made with it:   Buffalo Check Christmas Plaid

I used Black Momento ink on Whisper White cardstock to stamp the Buffalo Check image.    If you subscribe to my mailing list, you’ll be able to download my free report ““The 8 Essential Tools Every Paper Crafter MUST have to be Successful” .  #2 is a clear flexible ruler.  I used this ruler and my Cherry Cobbler Stampin’ Write marker to draw lines between the checks to create more of a ‘plaid’ than Buffalo Check.  I really love the way it turned out.

I used the Country Home stamp set to stamp the milk can and colored it using the Basic Gray Stampin’ Blends markers.  I added hi-lights with the Stampin’ Blends Color Lifter.  (You can get this FREE from me; see below.)    Then I cropped some pine needles from Old Olive cardstock, a berry spring in gold foil sheets, and leaves in Vellum.  I stamped the candy canes in Cherry Cobbler ink and fussy cut them out. I stamped the sentiment from the Winter Woods stamp set onto a scrap of Whisper White and fussy cut that out as well.

Every where I look, I see Buffalo Check patterns, from clothing to housewares, to Christmas decor.  It’s so on trend.  I love that Stampin’ Up! offers us products that are so trendy.  I stamped several pieces of cardstock, in different colors, so I plan on making lots of cards with Buffalo Check backgrounds!  Follow my Facebook page to see them all.

All of the items I used are available for sale in my online store if you want to purchase any of these items.   Online ExtravaganzaHappening Now:

Our new two-day sale is 10% off annual catalog stamp sets and kits. Supplies are limited, so shop now and get your hands on some new favorites! 10% off is like getting FREE SHIPPING (shipping is 10% of your order when your order reaches $69.95)  Who doesn’t like FREE SHIPPING? This Sale ends midnight on November 26 so don’t wait!  SHOP NOW!  *Annual catalog products only, exclusions apply, item quantities limited.

Color lifterGet a Stampin Blends Color Lifter Pen FREE when you place a qualifying order of $75 or  more (before tax and shipping) thru my online store in November and use the Host Code 9ZGDUJ4M.  If your order is $150 or more, do not use the Host Code; you will be automatically qualified to receive the Stampin’ Blends Color Lifter. 

Please leave me a comment and tell me what you think of today’s project.  Do you have the Buffalo Check stamp set yet or plan to get it?  I think you’ll love it as much as I do.

Happy Stampin, and thanks as always for choosing to shop thru me to purchase your Stampin’ UP! supplies.  I appreciate it.

Nancy Gleason. Stampin' UP! demonstrator, teacher, and blogger

Sunday Stamps Challenge

I think challenges are a great way to stretch your creativity, and so I am endeavoring to play along with 2 challenges each week.  This week, I chose to play along with The Sunday Stamps challenge.  The sketch is a great layout which allowed me to showcase our beautiful DSP and the stunning Hibiscus flower from “Humming Along” the soon to be released stamp set from Stampin’ Up!  (Yes, my last blog post featured this flower as well and you can see that here).  Here is the sketch that inspired today’s project:

Sunday Stamps Challenge 192And here is my take on it:

The gorgeous gingham DSP is a new paper called Gingham Gala and it will be available in Jan 2019 in Stampin’ Up!’s 2019 Occasions Catalog, along with the “Humming Along” stamp set.  I colored in the Hibiscus with our Stampin’ Blends markers in Daffodil Delight.     I love how the darling gingham just pops against a the tiniest bit of Basic  Black.  And because no envelope should be left naked…

Humming Along Yellow Hibiscus

The gingham paper has a larger check on one side, and a smaller check on the other.  I used the larger check to dress up the envelope flap so it coordinates perfectly but isn’t an exact match.

I hope you like my project today.  I encourage you to play with the Stampin’ Blends markers.  It is so easy to create a perfectly shaded and hi-lighted image with our Stampin’ Blends alcohol markers.  Here’s an up-close of the flower colored with the Stampin’ Blends so you can see the shaded and hi-lighted areas.

a yellow colored Hibiscus flower colored with Stampin Blends

Start practicing and you’ll be coloring and shading like a pro in no time!  To help you get started check out my promotion below:

Color lifterGet a Stampin Blends Color Lifter Pen FREE when you place a qualifying order of $75 or  more (before tax and shipping) thru my online store in November and use the Host Code 9ZGDUJ4M.  If your order is $150 or more, do not use the Host Code; you will be automatically qualified to receive the Stampin’ Blends Color Lifter. 

COMING SOON!  OnLine Extravaganza!  Stampin’ Up!s answer to Black Friday, Small Business Saturday and Cyber Monday all wrapped up in one easy to shop sale!  Check back on Friday, Nov.23 when the fun begins!

Thanks for stopping by my blog and taking the time to check out my project.  I love when you tell how you liked a project so please leave me a comment.  And thank you for shopping with me, I appreciate your orders.

Happy Stampin’,

Nancy

Humming Along

One of the stamp sets I got during Prize Patrol at OnStage last week is a line art stamp set called “Humming Along”.  Not only does the line art give me the chance to color with my watercolor pencils or Stampin’ Blends, but the fonts in the stamp set are A-M-A-Z-I-N-G!!!  Let’s take a look at the stamp set:

Humming Along

That gorgeous Hibiscus flower!  Right?  Now look what happens when you add some color with our Stampin’ Blends:Humming Along

So simple yet so striking!

How I did it:

I used Old Olive cardstock for the card base, and layered my Whisper White panels with Basic Black.  I used Tuxedo Black Momento Black ink and shaded with Cherry Cobbler (light & dark), Old Olive (light & dark) and Crushed Curry (light & dark) Stampin’ Blends markers.

I saw these flowers all over Florida and even snapped a few pictures of these red beauties: Hibiscus in Orlando FL

Cling Mount Stamps

The Humming Along stamp set is the new “Cling” type stamp set.  Not familiar with Cling?  Click here to learn all about the new Cling stamps from Stampin’ UP1

This stamp set will be available in the 2019 Occasions Catalog which goes live to customers January 3, 2019.  Can’t wait?  I can show you how you can get this stamp set sooner.  Ask me here.

Want another look at my project?  Here is it again: Humming Along

Stampin’ Blends

If you haven’t tried the Stampin’ Blends yet, grab yourself a few.  I started with a few basic color combinations (I choose green, yellow, red/pink to make flowers and added to my color collection from there.  Of course, I got the Color Lifter as well so I could remove my mistakes and add hi-lights.  Order Stampin’ Blends here.

I find coloring with the blends to be therapeutic; it’s so calming and relaxing and just plain fun.  Just start coloring and soon you’ll be just humming along, and then; the end result?  Something to be so proud of!  Your friends and family will oooh and aaaah over your creations for sure!

I love hearing from you.  Please leave me a comment and tell me what you think about the Humming Along stamp set or my project.  Thanks friends!  COMMENT HERE. 

SUBSCRIBE to my FREE monthly newsletter & exclusive offers.

***NEW*** Love the Projects found in the Catalog?  Shop by Project here.

Like My Stampin Space page on Facebook.

Follow me on YouTube.


I’m addicted to coloring!

My name is Nancy Gleason, and I’m addicted to coloring!  Adult coloring is such a popular hobby but when you are coloring with the Stampin’ Blends markers and the new stamp sets from Stampin’ Up!, it’s like adult coloring on steroids!  And I’m not ashamed it’s created an addiction!

The new round of Sale-A-Bration was just released on Feb. 16th and this new Blossoming Basket bundle with the Blossoming Basket stamp set and coordinating Basket Weave TIEF is enabling my addiction!  Let me show you what I’ve been working on:Blossoming Basket stamp set colored with Stampin' Blends

The coordinating Basket Weave Textured Impression Embossing Folder has a deep texture that is just the perfect compliment to this basket.  I added some ink to the TIEF to create even more depth!  A 2″ strip adds just enough texture to this card.

The more I use the Stampin’ Blends markers the more I love them!   Look at the shading you can achieve:  I used Crumb Cake for the basket, Daffodil Delight on the large rose, Calysp Coral for the smaller roses, Cherry Cobbler for the berries, and Old Olive for the leaves.  A small swipe of Ivory under the basket helps to ground it.

Blossoming Baskets in Yellows & Oranges

Have you tried the Stampin’ Blends yet?  I can’t get enough of them!  You can see some other projects I made with Stampin’ Blends here and here.  Come back again as I’ll have another card that I made with this stamp set but in a totally different color combination.

Sale-A-Bration

Blossoming Basket

This is the stamp set Blossoming Basket that is available for free during Sale-A-Bration with a qualifying order.  You can always order Stampin’ Blends to qualify for this stamp set which comes bundled with the Basket Weave TIEF. You can watch a video from Stampin’ UP! here on the Blossoming Basket bundle.

Click here to place an online order now.

So much to color and not enough time to do it!  Too bad I have to go to work every day!  I’d rather stay home and stamp and color all day! That would be much more fun, don’t you think?  After looking at what you can do with Stampin’ Blends markers, it’s not really a bad thing that I’m addicted to coloring!


Rose Wonder meets Stampin’ Blends

Did you ever wonder what happens when the stamp set Rose Wonder meets Stampin’ Blends?  Well, I’m going to show you!

Without any further adu, here is the teaser I showed last week.  (Yes, I did tell you to check back in a few days for the finished project.  A case of the flu set me back about a week!  I am feeling so much better now, thank you. )Rose Wonder Meets Stampin' blends
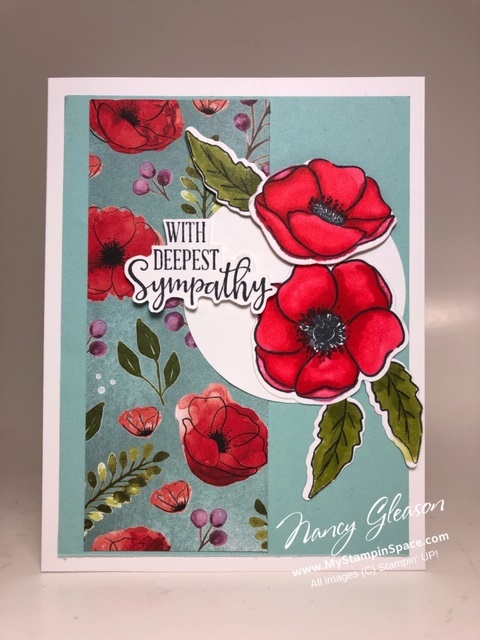
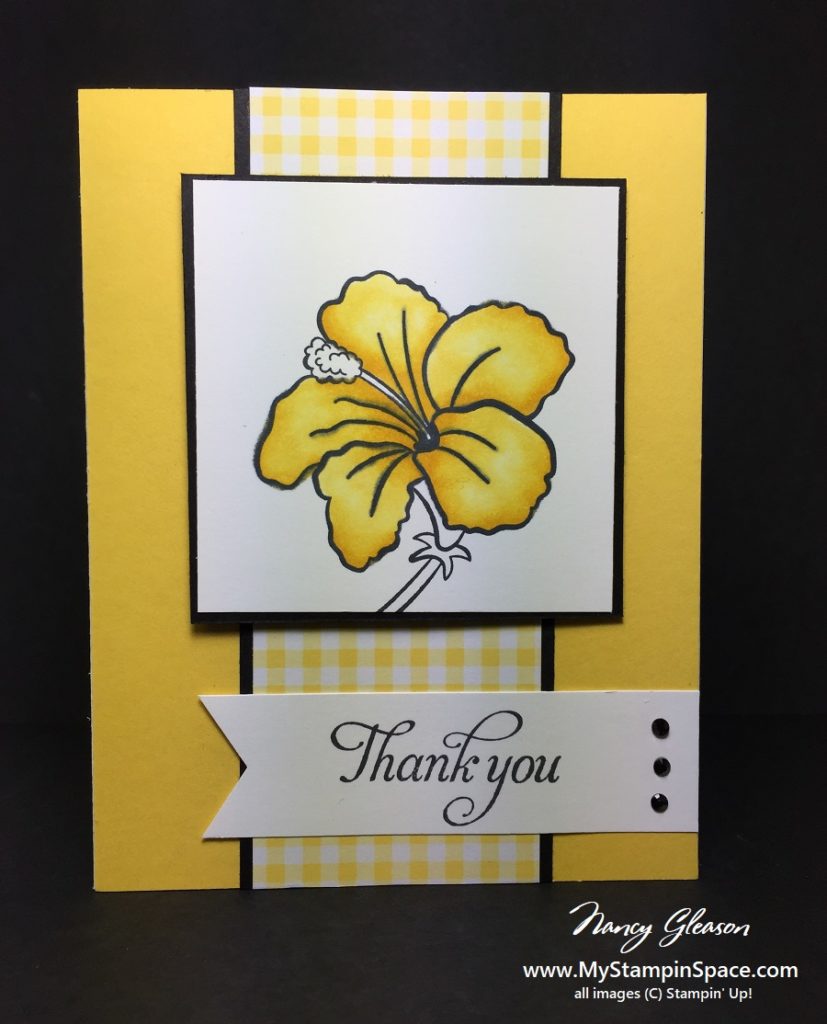
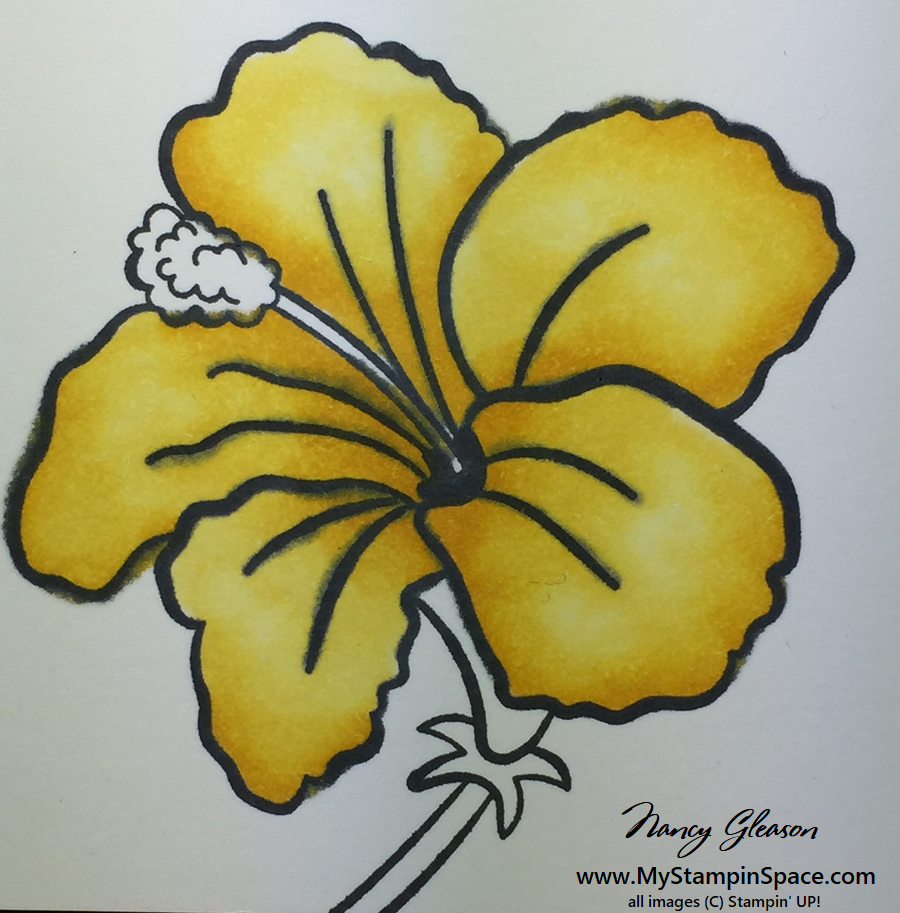
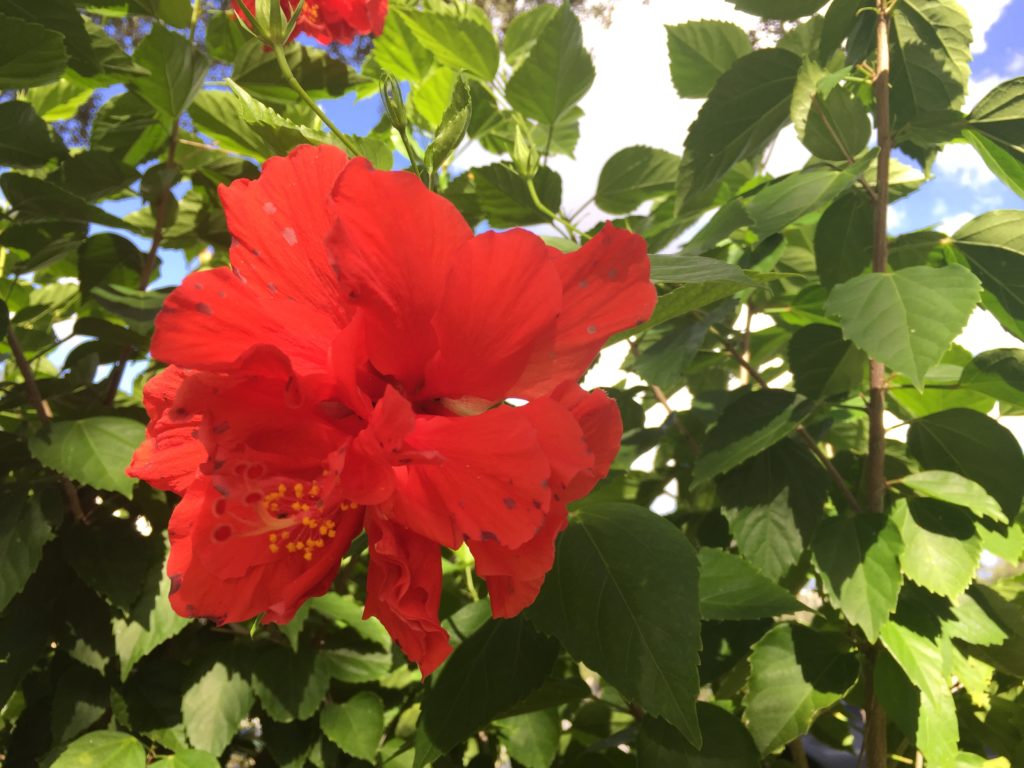
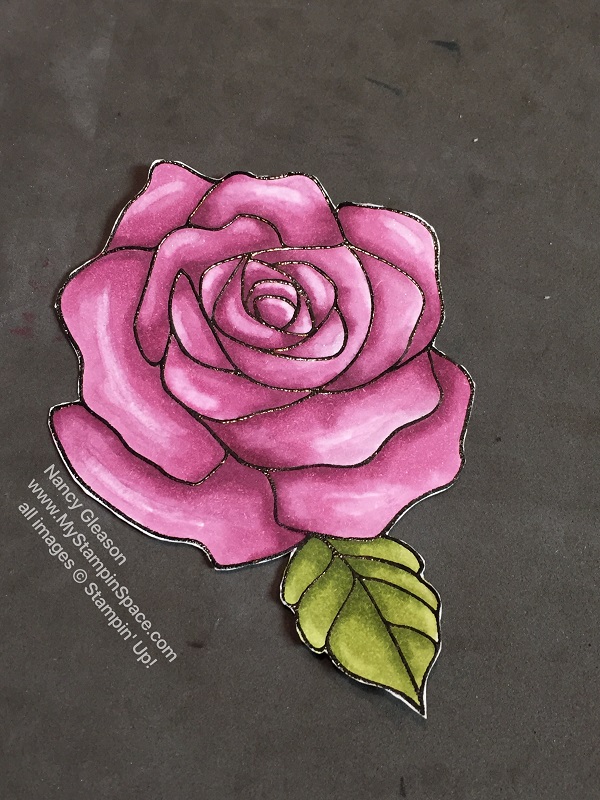
I am just loving coloring with the Stampin’ Blends markers and the remarkable shading and hi-lighting that is possible with these markers.  With a light and a dark shade of each color, the stampin’ blends alcohol markers allow you to blend colors seamlessly.  The addition of a color lifter allows you to ‘lift’ or remove color to create hi-lights.  After coloring this flower, I fussy cut it out.

For this flower, I used Rich Razzleberry and Old Olive  Stampin’ Blends.

Here is the card I made with that flower: Rpse Wonder meets Stampin' UP! 
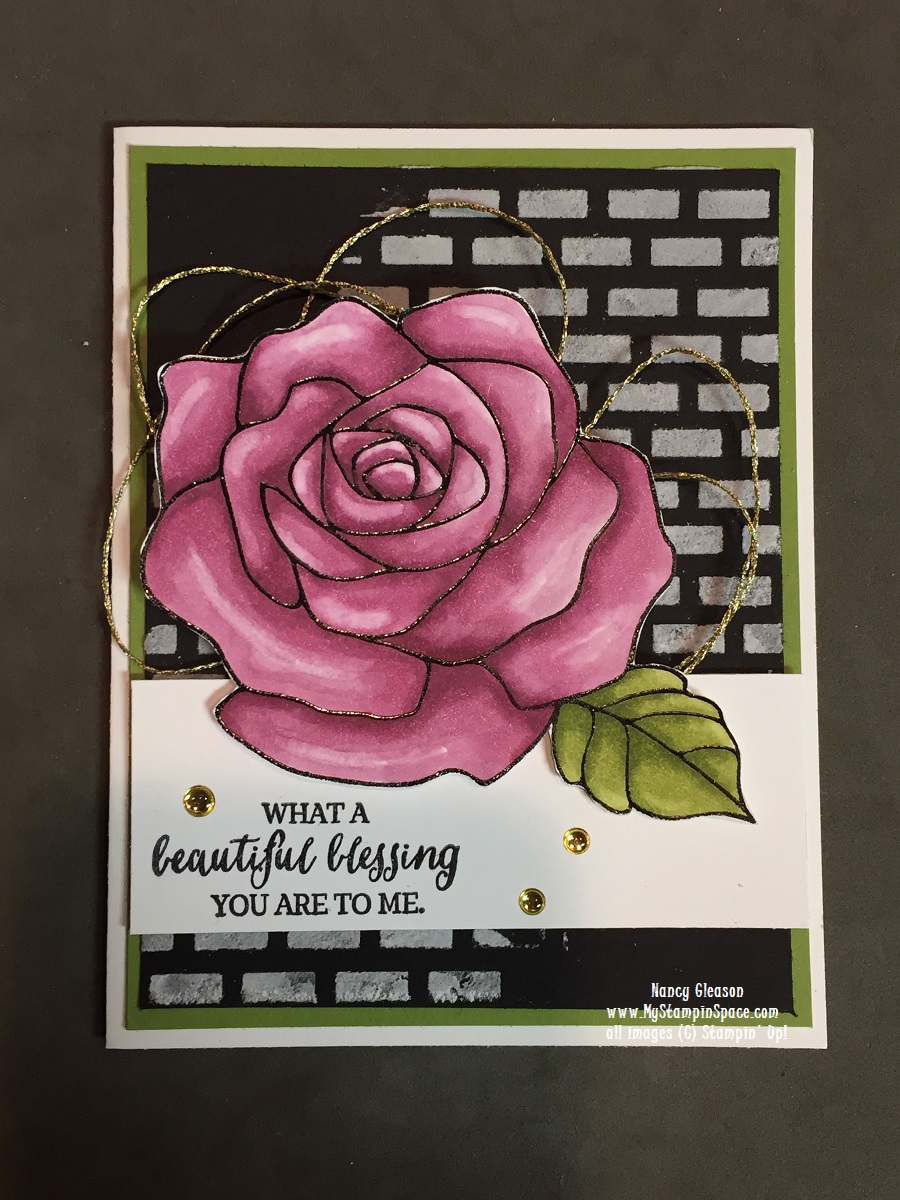
I used embossing paste to create the subway tile look on the background.  I like how the black and white make the perfect backdrop to this stunning flower.  A little bit of gold thread and gold embellishments add just the right amount of bling without stealing the show from the star of the show.

Have you tried the Stampin’ Blends yet?  I encourage you to give them a try.  You can get the entire collection of Stampin’ Blends or just pick up a color or two.  I would recommend a set of Old Olive and a pink or blue or yellow to be able to make a flower, and of course the color lifter.  Watch this video to see how to work with the Stampin’ Blends markers.

Sale-A-Bration

During Sale-A-Bration you will earn a Level 1 reward for every $50 you spend, or a Level 2 reward for every $100 you spend before tax and shipping.  Did you see the new Sale-A-Bration items just released? Click Here for the 2nd release.   The new Blooming Basket just begs to be colored with Stampin’ Blends!

Blossoming Basket

When you purchase the $99 Ultimate Starter Kit during Sale-A-Bration, you can choose $125 worth of products for only $99 plus free shipping, AND you can choose any 2 stamp sets for FREE as well.  What will you choose?  Decide what you want, then CLICK HERE to purchase the $99  Ultimate Starter Kit.

So, what do you think about Rose Wonder meets Stampin’ Blends?  Leave me a comment here.  I love to hear from you.

How to Use the Stampin’ Blends and How to Get them on Sale!

Today’ I am going to show you how to use the Stampin’ Blends markers to achieve a soft, gradated or ombre look. I recently taught a class on how to use the Stampin’ Blends and I want to share that project with you.  This example uses Pool Party Stampin’ Blend markers.

How to Use Stampin' Blends with the Birthday Wishes for You Stamp Set
See how the color is darker at the bottom of each letter and lighter towards the top? That’s the beauty of the Stampin’ Blends markers!

I used the Birthday Wishes For You, #145742 stamp for the Happy Birthday, and used the light and dark of each shade of color to get my results.

There are a couple of tips you should know about to get good results with the Stampin’ Blends.  First, use the Memento Tuxedo Black Ink,  #132708 to stamp the outline stamp.  There are several stamp sets in our Annual Catalog, as well as the Occasions catalog that will work wonderfully with the Stampin’ Blends.  Secondly, you need the light and dark version of each color.  You will always want to color with a scrap piece of paper under the piece you are working on.  The markers do bleed thru the cardstock and you don’t want to ruin your work surface.  

Here are other versions of the same card – This one uses Old Olive Stampin’ Blends and Old Olive cardstock:

How to Use Stampin' Blends with the Birthday Wishes for You Stamp Set

Here we go with Pink Pirouette Stampin’ Blends and Pink Pirouette cardstock:How to Use Stampin' Blends with the Birthday Wishes for You Stamp Set

And lastly, below is Daffodil Delight Stampin’ Blends and Daffodil Delight cardstock:How to Use Stampin' Blends with the Birthday Wishes for You Stamp Set

Do you have a favorite?  I have to say that whatever color I was coloring at the time was my favorite; I love them all!

This is a great stamp set to practice with the Stampin’ Blends as it very forgiving.  I started with the dark shade at the bottom of each letter, working 2-3 letters at a time, then I went in with the lighter shade working from the top down.  I overlapped the light shade over the ‘line’ where the light and dark met.  This coloring back and forth across that line allowed the colors to blend so that the colors blended together, rather than having a hard line.

I recently taught the ladies at my Wine Down Wednesday stamp class how to make this card.  Everyone walked away with a card they were proud to show off, and loved the Stampin’ Blends!

I’ll be showing a more detailed image colored with the Stampin’ Blends later this week so make sure you come back to see that. In the meantime I wanted to share with you how you can get Stampin’ Blends for yourself.

what’s the best way to get stampin’ blends?

You can buy the markers individually for $4.50 each or $9.00 for the set of Light and Dark shades of each color.  There are 12 Colors plus a Bronze, and Ivory, and a Color Lifter pen for a total of 27 markers.  You can purchase the Stampin’ Blends Marker Collection for $121.50 plus 10% shipping. Or you can purchase the Stampin’ Blends Collection for $99 and get free shipping.  Which option will you choose?  If you want to order the Stampin Blends Marker Collection for $121.50, or buy individual markers, CLICK HERE.

If you want to get the entire set of 27 Stampin’ Blends markers for only $99, you can purchase the $99 Starter Kit.  You get to choose $125 worth of products, and get free shipping.  With this option you can elect to become a ‘wholesale customer’ or ‘hobby demo’.  You can also choose to become a ‘business builder’.  Either way you get the same perks and benefits and you get to enjoy the discount, the early catalog reveal and more.  You’ll become part of my team, My Stampin’ Circle, too!

I hope that you’ll take advantage of the $99 Starter Kit deal to get the complete set of Stampin’Blends as this is the best bang for your buck!  Oh, and did I mention that you will also get to choose 2 FREE Stamp Sets (any value) when you purchase the $99 Starter Kit during Sale-A-Bration (thru March 31st)?  Which 2 stamp sets will YOU choose for Free with YOUR starter kit?

If you enjoyed the projects in today’s post please COMMENT HERE  I love hearing from you. If you have any questions, feel free to EMAIL ME.  And don’t forget to SUBSCRIBE to my FREE monthly newsletter & exclusive offers.

I hope you enjoyed learning How to Use the Stampin’ Blends Markers and how you can get them discounted by purchasing the $99 Starter Kit.

Happy Stampin’

Nancy Gleason. Stampin' UP! demonstrator, teacher, and blogger